

NOTE: Prepasted Removable Smooth Wallpaper is not recommended for use on walls with texture or walls painted with "scrubbable" paints. We recommend a smooth primed surface prior to installation.
GETTING READY
MATERIALS
Painter’s tape
Paint roller or sponge
Sharp utility knife
Extra blades
Drop cloth
Bucket of clean water
PREPARE YOUR PAPER
Unroll each strip so that they face the same way. The top of the strip has no white space, and the bottom has a narrow line of white labeled "bottom." Do not trim any part of the paper before hanging.
PREPARE YOUR WALL
Before applying any wallpaper, ensure your wall is smooth, clean and dust-free. Patch or sand any damaged areas of the wall, especially where sharp edges might pierce or tear the wallpaper. For best results, apply wallpaper to a surface that is a solid, light color. Allow recently painted or primed walls to cure for 4 weeks prior to installing wallpaper (applying wallpaper over uncured paint can lead to bubbling). Please note our Prepasted Smooth wallpaper is not recommended for use on walls with high texture or those painted with scrubbable paints.
START HANGING
START IN A CORNER
If you're applying multiple rolls of wallpaper, start in a top corner and hang them from left to right OR right to left to ensure a smooth repeat of the design. If covering an entire room, choose an inconspicuous corner to begin since the repeat may not match up on the final seam.
WET AND FOLD THE PAPER
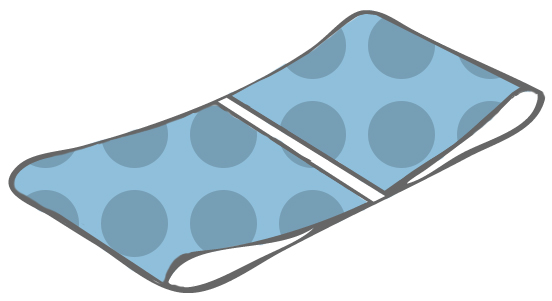
Using a clean paint roller or sponge, thoroughly wet the back of the paper, making sure not to leave any dry spots. Once it's wet, gently fold the pasted side in on itself by folding the top and bottom of each piece to meet in the middle, taking care not to crease the paper -- this is called "booking." Set the paper aside for 3-5 minutes to rest and activate the adhesive.
START APPLYING
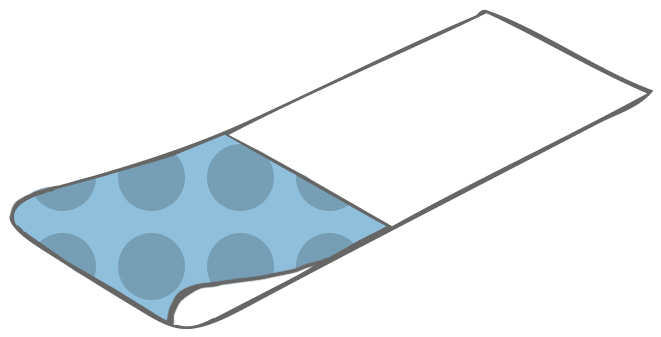
Pick up your first strip and unfold just the top half of the paper, leaving the edge labeled "BOTTOM" still booked.
Align the top of the wallpaper with the ceiling, making sure the edge is straight and even on the wall. Ask your friend to step back and check that the strip is straight and level. Painter's tape can be used to secure the paper if it begins to slip. Once the paper is in position, unfold the bottom half of the strip and smooth downward with a damp sponge. Take care to remove large air bubbles as you go; smaller bubbles will dissipate as the wallpaper dries.
BEGIN OVERLAPPING
Pick up your second roll of wallpaper and apply it so that the new roll overlaps the edge of the previous roll by approximately ¾ inch (1,9 cm), carefully visually matching the repeat. There is no need to trim the overlap; it guarantees that the wallpaper will repeat seamlessly. Repeat this step, aligning each new roll over the previous one.

FINAL STAGE
Let your wallpaper dry completely -- this usually takes about 3 hours -- before using a sharp utility knife to trim any extra paper along the bottom or side of the wall. Wipe the walls with a damp sponge to remove excess adhesive. Now stand back and admire your work!
REMOVAL
To take down Prepasted Removable Smooth Wallpaper, start at the corner of one roll and gently peel back from the wall. If the paper is being stubborn, use a damp sponge to reactivate the adhesive to allow it to release more easily. Once the paper is removed, the wall can be wiped with a damp sponge to clear up any remaining adhesive residue.